Creepy cookies
Hey guys,
It is super close to Halloween now and I am extremely excited for it. I hope you all have big plans, whether that be a party, trick or treatin' or watching spooky films all night. No matter what you guys do I hope you all have an awesome time!
Today I will be showing you how to (attempt to) make some creepy cookies. I apologise in advance for my baking skills, they aren't quite up to scratch yet. But then again if you don't try, you'll never know eh?

So first of all you'll be needing to gather your ingredients for the biscuit dough. I always follow a recipe without eggs because; one it is simple to do, and two I never seem to have eggs in.
Biscuit dough:
Caster sugar: 2 oz


Follow the instructions on the icing (depending on which sort you go for). For the ready to roll icing you can place the biscuit on top of the icing and use a knife to cut around. Use some water to stick the icing onto the biscuit and wrap the edges round.
For colouring you can roll out the icing and place into a bowl with some food colouring and then mix around so all the icing is covered. This seemed to work really well for the orange food dye to make the pumpkin shapes. However, it was slightly difficult to colour for the black icing (I would recommend getting the black ready to roll icing instead of using food colouring). Then you can add little details (such as eyes) with straws and using a knife dipped into the food dye, just to add a little extra to the cookies.


Butter: 4 oz
Plain flour: 6 oz
Almond extract: several drops
Simple enough to get? I do usually use vanilla extract however this time I accidentally ordered almond extract I thought I would try something new. First of all pre heat your oven to gas mark 2/150°C. After you have done this you can begin with the dough and start to mix the sugar and butter together until it has a sort of fluffy texture. Then add in the flavouring. You can also add in some food colouring at this point depending on what cookies you are making. Once this is all mixed in you can add a little bit of the flour and mix in, then repeat this until you are able to make a ball of dough without the mix falling apart.
Next step from here is to sprinkle a little flour over your work surface and then roll out the dough. Then you can start cutting the dough into spooky shapes like spiders, ghosts, pumpkins and gravestones. I wasn't able to find any around the shops so I drew them out and cut them up to work around. Once you have done this you will need to butter up your baking tray so the biscuits don't stick to the tray, that's the last think you want to happen! Then place in the oven for around 20/25 minutes depending on how thin the biscuits are. It is always better to start off with a lower time so you don't accidentally over cook the cookies!
Next step from here is to sprinkle a little flour over your work surface and then roll out the dough. Then you can start cutting the dough into spooky shapes like spiders, ghosts, pumpkins and gravestones. I wasn't able to find any around the shops so I drew them out and cut them up to work around. Once you have done this you will need to butter up your baking tray so the biscuits don't stick to the tray, that's the last think you want to happen! Then place in the oven for around 20/25 minutes depending on how thin the biscuits are. It is always better to start off with a lower time so you don't accidentally over cook the cookies!


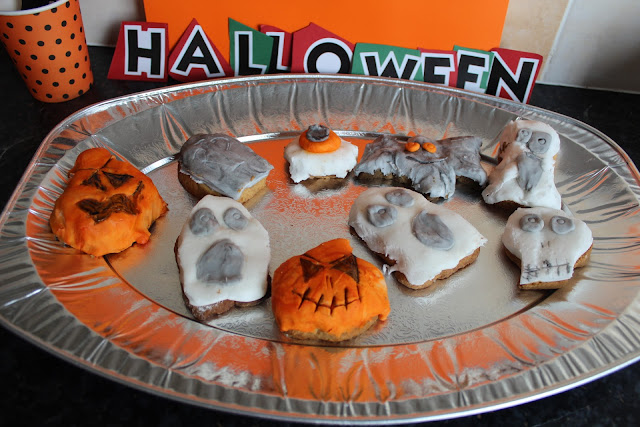
Once your cookies have baked to perfection and cooled down you can begin the fun part - decorating! I always always go for using icing sugar and making my own icing but somehow I always end up destroying any sort of dignity the poor biscuits had. So, this time I decided to go for ready to roll icing. It did work better than the icing sugar so that is a plus side!

Follow the instructions on the icing (depending on which sort you go for). For the ready to roll icing you can place the biscuit on top of the icing and use a knife to cut around. Use some water to stick the icing onto the biscuit and wrap the edges round.
For colouring you can roll out the icing and place into a bowl with some food colouring and then mix around so all the icing is covered. This seemed to work really well for the orange food dye to make the pumpkin shapes. However, it was slightly difficult to colour for the black icing (I would recommend getting the black ready to roll icing instead of using food colouring). Then you can add little details (such as eyes) with straws and using a knife dipped into the food dye, just to add a little extra to the cookies.


Once this has all set you are ready to serve them all up, or feel free to lock them away from everyone else!


Super easy to do and really cheap as well. If you are trying these or have tried this out let me know how it goes for you! Tank you for reading today!
Peace out!


Comments
Post a Comment